Using File Attachments in Findings
Using attachments in Findings is so simple that it is easy to miss how powerful and flexible the feature really is. In this post, I’ll give you all the information you need to become a Findings wizard and make your lab work easier and more enjoyable.

Adding an attachment
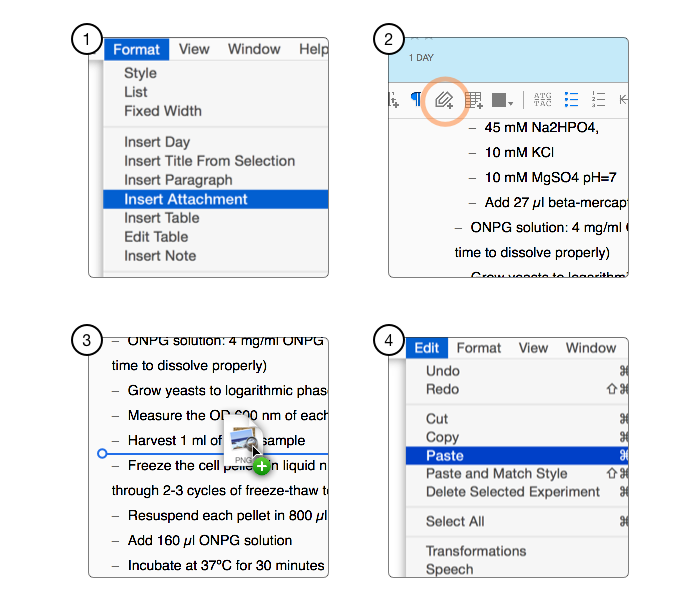
It is incredibly easy to add a file to an experiment or a protocol and create what Findings calls an attachment. It can be any file. In fact, it can even be a folder!
You have different options:
- Use the menu Format, then Insert Attachment (keyboard shortcut: alt-cmd-A);
- Use the paperclip icon in the document editor toolbar;
- Drag and drop a file;
- Paste an image (read more about this option later in this post, under the ’Screenshots’ section).
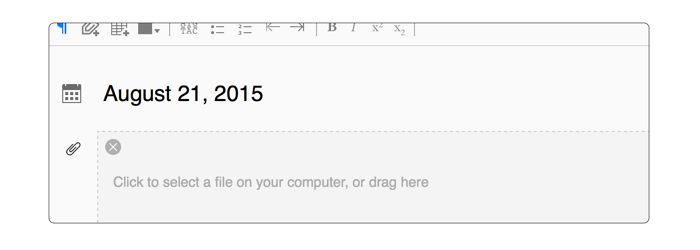 If you use option 1 or 2, you then need to click on the empty attachment box , and select the file or folder to insert using a standard OS X file browser. As an alternative, you can also drag a file into the box.
Independent of the method you use, the file attachment that appears in your experiment is safely stored on disk inside your libray, alongside the experiment itself. If you had selected a file from the Finder, Findings will make a copy before inserting it, and leave the original untouched.
The attachment box
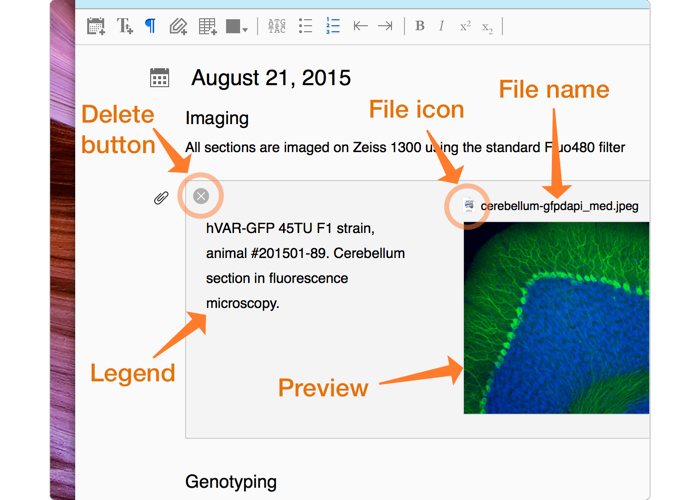
The attachment you added will now nicely stand out as a box integrated in your experiment or protocol. The layout of an attachment box is straightforward:
- Delete button: in case you changed your mind, it’s very easy to remove an attachment (and if you change your mind again about that deletion, you can still ‘undo’ with cmd-Z!);
- Attachment legend: edit it like you would any other paragraph;
- File preview: Findings generates a preview of your file so you can tell at a glance what it represents; click to toggle between a small and large version; it works as you’d expect for images, but also for many other types of files, leveraging the “QuickLook” feature of Max OS X;
- File icon and file name: double-click to open and edit the file, which I will now explain in more details.
Opening and editing an attachment
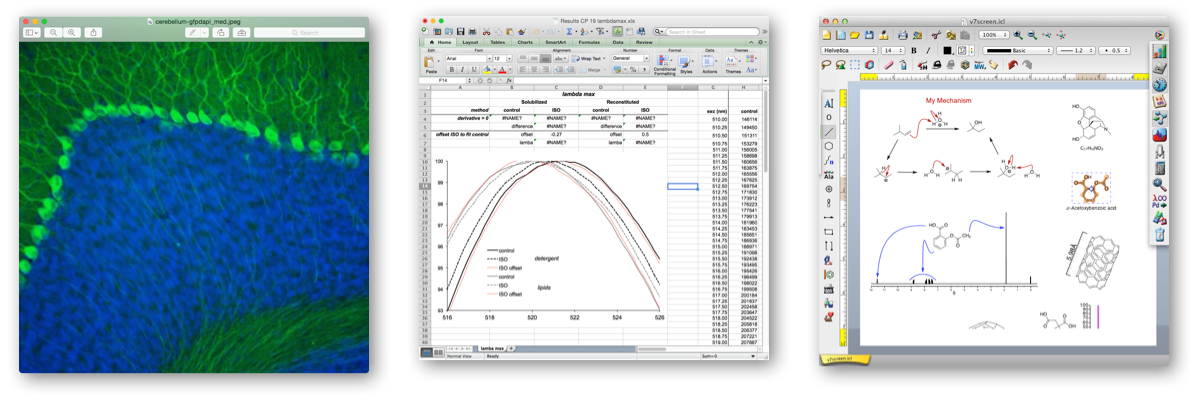
The file attachment is stored as-is on disk, inside your library, and can thus be opened just like any other file on your computer. From Findings, you can simply open an attachment by double-clicking on the icon or file name. The file opens in the default application for that type of file: image files and PDFs will typically open in the Preview app; spreadsheets will open in Numbers or Excel, depending on their type; chemical structures will open in ChemDraw or the application in which they were created; plasmid maps will open in EnzymeX or DNAStrider or the corresponding app; etc. The file can be viewed and edited just like any other app. Findings can thus leverage all the applications you already use and are already familiar with, even if we never heard of it, now and in the future!
You might still wonder where exactly is the file? Once the file is opened, you can easily get to it on your disk as follows:
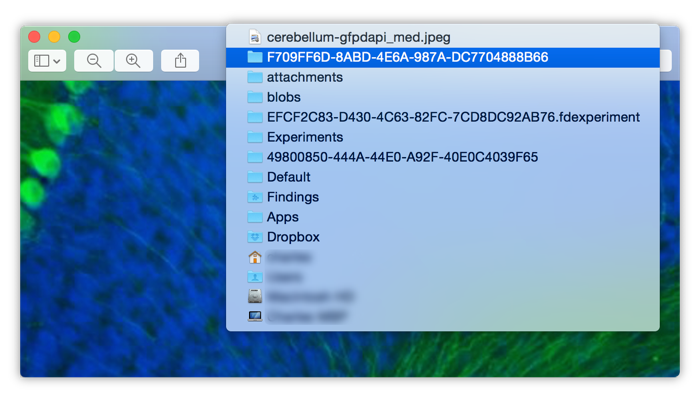
- Cmd-click on the window title bar;
- Select the enclosing folder in the popup menu;
- The folder will be revealed in Finder.
As you can tell, the attachment is indeed inside your Findings library, and more precisely inside the file package for the corresponding experiment or protocol. The layout and naming of the files was optimized to provide fast and reliable access for the Finding app, which is why the foder names are somewhat intimidating and mysterious. We plan to make it even easier in the future to browse your data without Findings, but rest assured it is all there, safe and under your control. You can also read more about Findings file organization in the blog post “Your Data is Yours”.
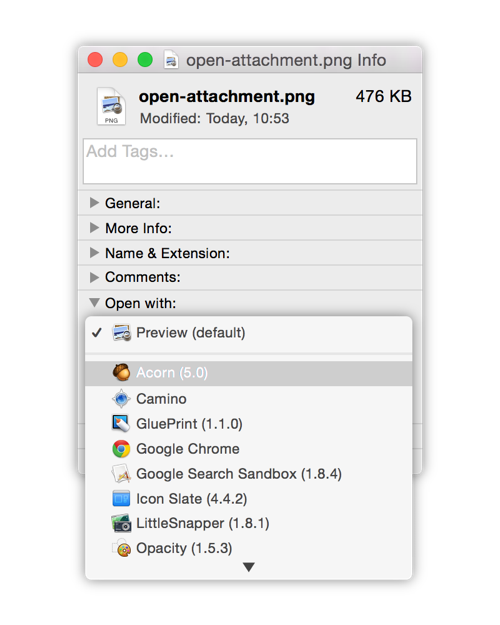
As explained above, Findings opens a file attachment in the default application you have set on your system. You might be wondering how it is actually decided. When you install OS X, and later install more apps, the different file types are “claimed” by the installed apps. In most cases, you do not need to alter that behavior, but there might be occasions where you would want to change it. For instance, you might prefer to have all your tiff files open in Acorn for easy editing. Here is how to do it:
- Select the file in Finder
- In the File menu, select Get Info (keyboard shortcut cmd-I)
- In the ‘Open with’ pane, select the application in the popup menu.
Clipboard and Screenshots
At the beginning of this post, I mentioned that you can also add an attachment by pasting an image into an experiment or protocol. This option can easily be overlooked, but it is very powerful. Many apps will place an image into the clipboard when you use the ‘Copy’ menu item. For instance, in Numbers, you can select a graph and then ‘Copy’. When you then ‘Paste’ into Findings, an image of the graph is inserted.
It is also very easy to insert a screenshot of anything you have on your computer screen. This can be useful if you want to highlight part of a spreadsheet or of any large document that you also have as a separate attachment. Follow these simple steps:
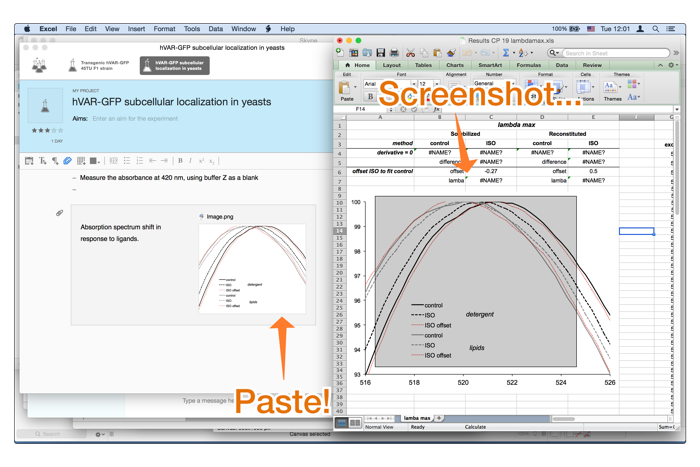
- Make sure the element you want to capture is fully visible on screen;
- Press the keyboard shortcut cmd-ctrl-shift-4;
- Select the area you want in the screenshot;
- Go back to Findings;
- Select where you want the screenshot to appear;
- Paste the image (keyboard shortcut cmd-V).
Protocols and file templates
For the most part, attachments work the same way in experiments and protocols. In fact, everything I have described so far applies to both. Interesting things start to happen when you insert protocols into experiments. If you don't use protocols, you may not be fully familiar with how they work or what they are useful for (and yes, that would be the topic for another post!). Basically, you can think of protocols as reusable components for experiments. If you find yourself repeating the same steps over and over in multiple experiments, and with small variations you want to keep track of, you may have a good use case for a protocol. Once you have created a protocol, you can insert it into any experiment. The content of the protocol will be copied into the experiment. Further edits within the experiment will only affect the experiment, not the original protocol.
What happens to the protocol attachments when you insert it into an experiment, then? What happens to the files on disk? Well, of course, the copy of the protocol includes not just the text, but also all the attachments! This makes it possible for example to include a pre-formatted result file in the protocol with placeholder data, which will be automatically copied into each of the experiments in which you use the protocol. The copied files can then be opened and edited as part of the experiments, without affecting the original template file in the protocol.
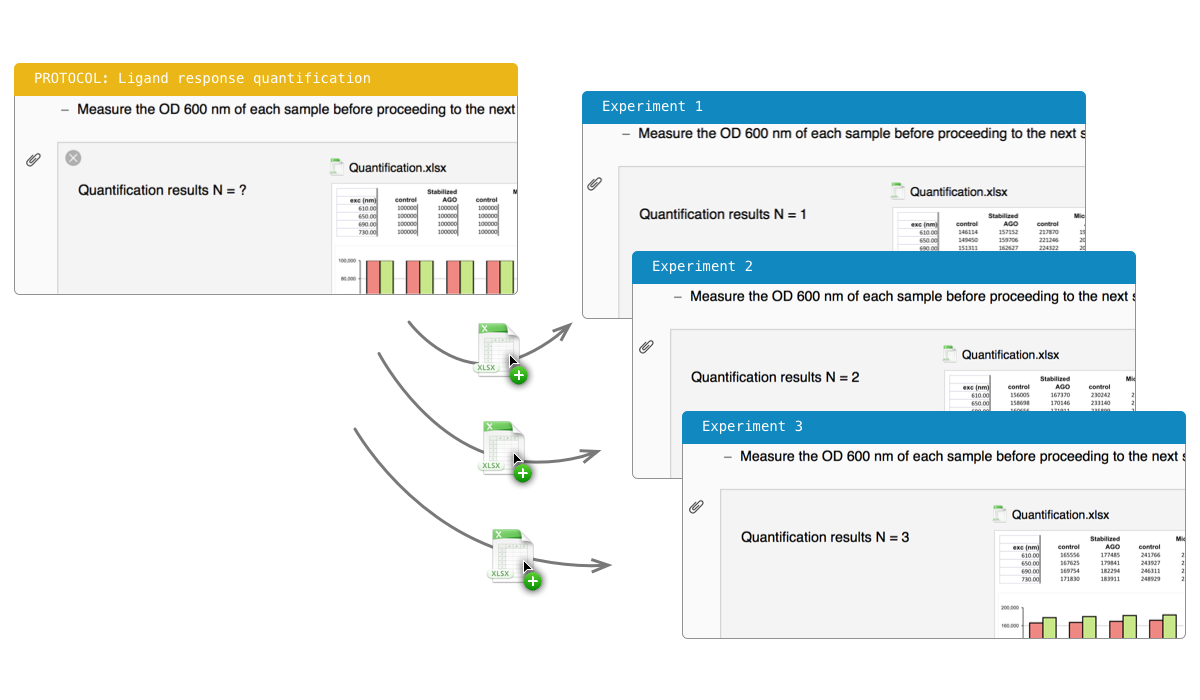
In summary, protocols can include not only lists of steps to follow for a particular procedure, but also a result section with ready-to-use template files for the data. This makes it very easy to get the repetitive tasks done for you, and lets you focus on the actual science and the results.
Thumbnails and vignettes
On an actual paper notebook, it is quite natural to look for a specific result by flipping through the pages, quickly scanning the content for a particular visual memory we have of that experiment. It would be great to bring that kind of experience to Findings, and take advantage of the visual memory we may have of our lab work.
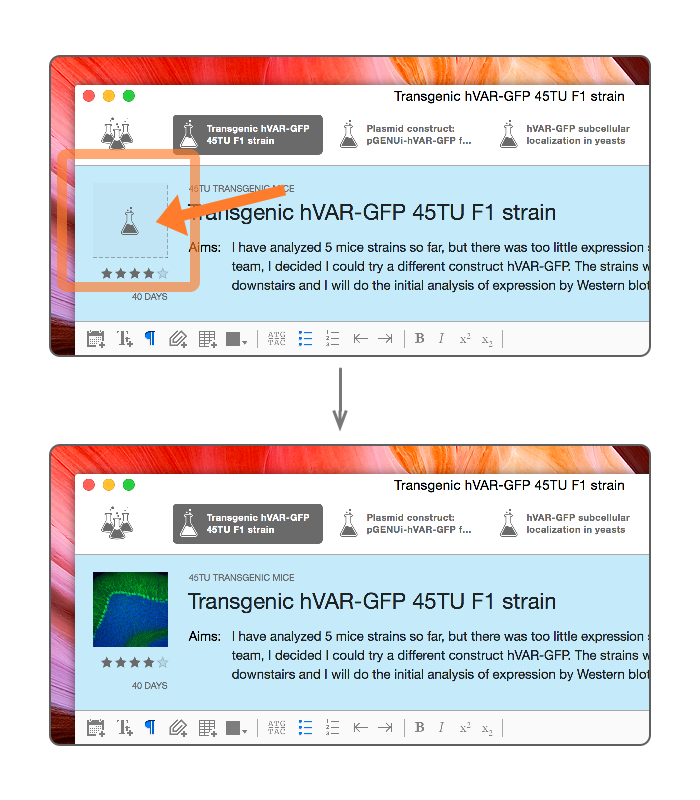
As I explained above, Findings generates preview images for all the attachments in your experiments. These thumbnails are great visuals into a document structure. There are many ways we plan to use these thumbnails in the future, but let's see what is possible today. There is already a simple feature you can take advantage, which we call "experiment vignettes". To set a vignette for an experiment, simply click on the flask icon displayed on the left side of the experiment header. The first attachment will then be used to add the thumbnail in that area. Simply click again to cycle through all the attachments in the experiment and to select the one that best represents the experiment. Voilà!
Larger files and file aliases
By default, Findings copies the files you attach to an experiment or a protocol. The rational for this behavior is that Findings wants to make sure those files are stored in the known location of your lab notebook, ensuring the long-term safety, reducing the risk of accidental deletions, and making backups much easier. However, for very large files or folders that you still want to reference from Findings, it might not be possible to copy them into your library. There are two other features that I'd like to cover on this topic.
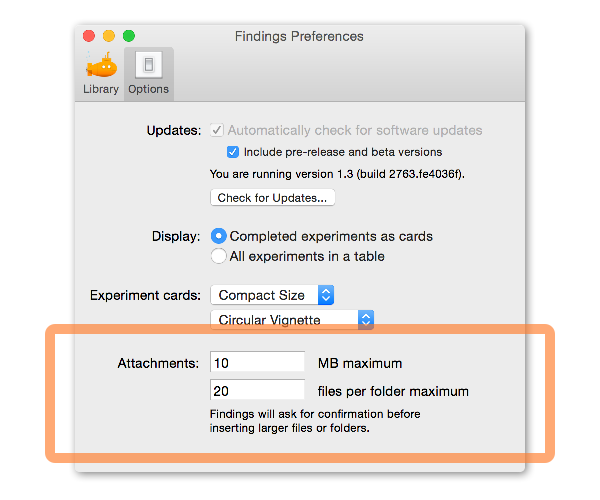
First of all, Findings will prevent the accidental copy of large files or folders. Above a certain threshold of size or file count, you will be asked for confirmation before a copy is made. This threshold can be set in the preferences (which you can access from the Findings menu). There are two settings, one for the file size, and one for the file count in the cases where you actually add a folder as an attachment.
If you still want to reference a large file or a large number of files, but not copy them, you can simply use an alias:
- Select the file or folder in the Finder;
- Open the File menu, and choose 'Make Alias';
- Drag the alias into Findings
You can then discard the alias from the Finder, as Findings will make a copy of the alias. To open the file or folder, you can still double-click on that alias from Findings, and the original will open. Of course, if the alias points to a file or folder on another volume (for example, on the network), it might fail to open if the resource is not available. In addition, aliases can break in some circumstances (for instance renaming a file on a network volume). Be sure to document what file the alias represents as part of your experiment, and be sure to backup those external files!
Future improvements and sneak peek
That was a brief tour of what you can do today with attachments in Findings. We have plenty of ideas for new features and improvements to the attachment feature. At this stage, there is no guarantee we will ever implement any of those, and thus I won't say too much about it, but please let us know what you would like to see. Your feedback is the main driver of Findings development.
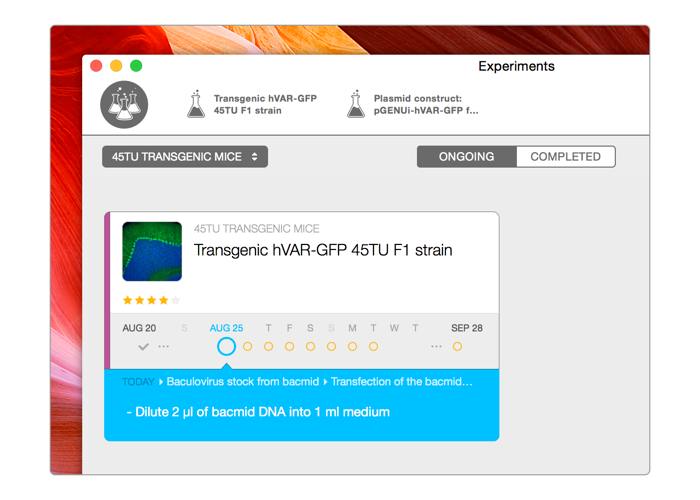
I would simply like to wrap up this post with a sneak peek at the next version of Findings and how we start using the experiment vignette to improve your experience. As you can see in this screenshot, the vignette will be part of the experiment card to provide a visual hint for the document. We have in fact tweaked the visuals on the entire card to improve its usefulness and provide a better summary of the experiment. It is available in the public 1.3 beta version already, which you can enable in the preferences. There are several new features being worked on for this version. If you feel adventurous, give it a try and let us know what you think. There are a couple of options in the preferences for the new experiment card look: tell us which layout you prefer.
That’s it for attachments! If you have questions, comments, or suggestions, on this topic or any other, let us know via email to feedback@findingsapp.com, to @findingsapp on Twitter or on our Facebook page.